
What are arepas?
Homemade Arepas are a traditional and versatile food in Latin American cuisine, known for their simplicity and deliciousness. These round flatbreads are made from a basic combination of white parboiled corn flour, lukewarm water, and a pinch of salt. These humble ingredients combine to create a dough that can be shaped, cooked, and customized in numerous ways.

Arepas have been a beloved food in Venezuela, Colombia, and Central America for centuries. Thanks to their unique taste and adaptability, their popularity has spread to various corners of the world. Arepas serve as a blank canvas for culinary creativity. Various ingredients can be enjoyed as a side or main course.
Different styles of arepas
Despite their simplicity, arepas have evolved into different styles and variations across various regions. Different places and households have their unique approach to making and enjoying arepas. The choice of style and preparation often comes down to personal preference and the area's culinary heritage. Whichever way you choose to make or savor them, the heartwarming essence of arepas remains a constant.
1. Venezuelan Arepas
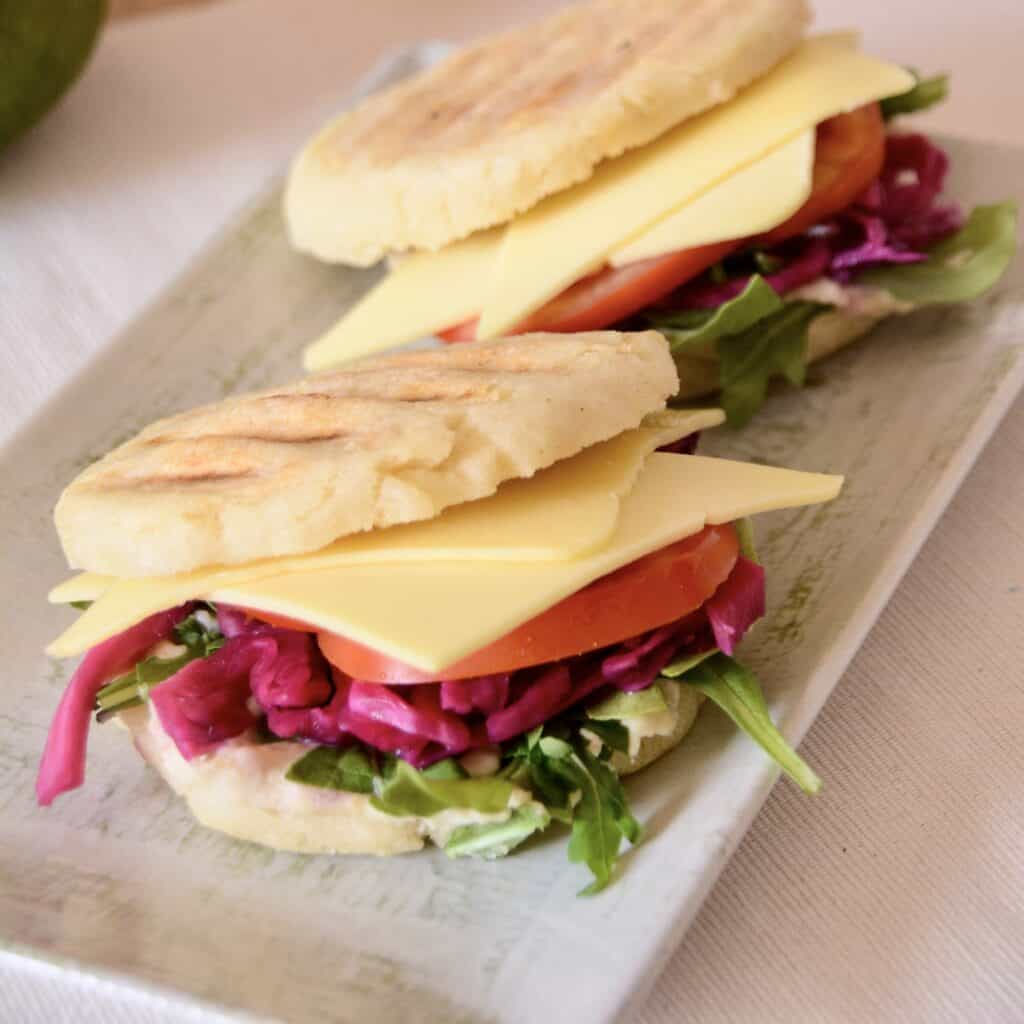
- Taller and Stuffed: In Venezuela, arepas are typically thicker, creating a substantial "pocket" that's perfect for stuffing with a wide range of fillings. These fillings can include shredded meats, cheese, black beans, avocado, and more.
2. Colombian Arepas
- Thinner and Topped: In Colombia, arepas are often thinner and broader, with a texture that's more like a flatbread. Instead of creating a pocket, Colombian arepas are ideal for placing toppings on their surface. Common toppings include cheese, eggs, or even condensed milk, making them a delightful combination of sweet and savory.
What can I eat with homemade arepas?
Arepas are a blank canvas waiting to be fitted with flavors. The options are as diverse as your culinary imagination. While there are traditional toppings that have been loved for generations, the beauty of arepas lies in their versatility.
Traditional Toppings:
- Reina Pepiada: This Venezuelan classic features a creamy chicken and avocado salad.
- Perico: A popular Colombian topping, Perico consists of scrambled eggs, tomatoes, and scallions.
- Black Beans and Cheese: A combination loved in Venezuela and Colombia. Hearty black beans and the creamy cheese.
Creative Combinations:
- Mediterranean: Try building something with creamy hummus, grilled vegetables, fresh herbs and lemon.
- Asian: Try using marinated tofu, sesame slaw, and a drizzle of sriracha for a perfect blend of umami and heat.
- Savory Spinach: Load your arepa with sautéed spinach, roasted cherry tomatoes, and a garlic aioli for a burst of green goodness.
- Tropical: Embrace a tropical vibe with fresh mango salsa, grilled plant-based protein, and a squeeze of lime for a refreshing, sweet, and savory experience.
There are no strict rules when it comes to enjoying arepas. Feel free to let your creativity shine and experiment with different ingredients and flavors.
How do you find the right flour for homemade arepas?
The success of your homemade arepas depends on the type of flour you use. When making arepas, you must pick the right type of corn flour. You need to buy white pre-boiled corn flour. On Spanish products, usually "Harina de Maíz, Blanco, precocida" can be found. It's the tried-and-true staple for making arepas across Latin American households.
Is Harina de Maiz, Blanco the Same as Polenta?
No, Harina de Maíz, Blanco is not the same as polenta. While they might appear similar, they have distinct differences in texture, size and how they're prepared. Arepas call for the unique characteristics of white corn flour, as using polenta may result in a crumbly texture.
Can I Use Cornstarch Instead of Corn Flour?
No, you cannot substitute cornstarch for corn flour when making arepas. Cornstarch has different properties and won't provide the right texture or taste. Stick to the choice of Harina de Maíz, Blanco for the best results.
Homemade arepas have three simple ingredients
Homemade Arepas only need three straightforward ingredients:
- 1. White Parboiled Corn Flour (Harina de Maíz, Blanco) The heart of every arepa is the white parboiled corn flour, Harina de Maíz, Blanco.
- Water. Balancing water and flour is a key step in achieving the right consistency, ensuring that your arepas come out with the perfect balance of softness and firmness.
- Salt. A touch of salt enhances the flavor of your arepas.
These three simple ingredients are all you need to start baking your homemade arepas.
How to make Arepas?
Making arepas at home is easy and quick. The dough can be mixed in two minutes and requires no kneading. With practice, shaping a perfect arepa is done in seconds. The baking process does not require too much attention.


Mixing the Dough
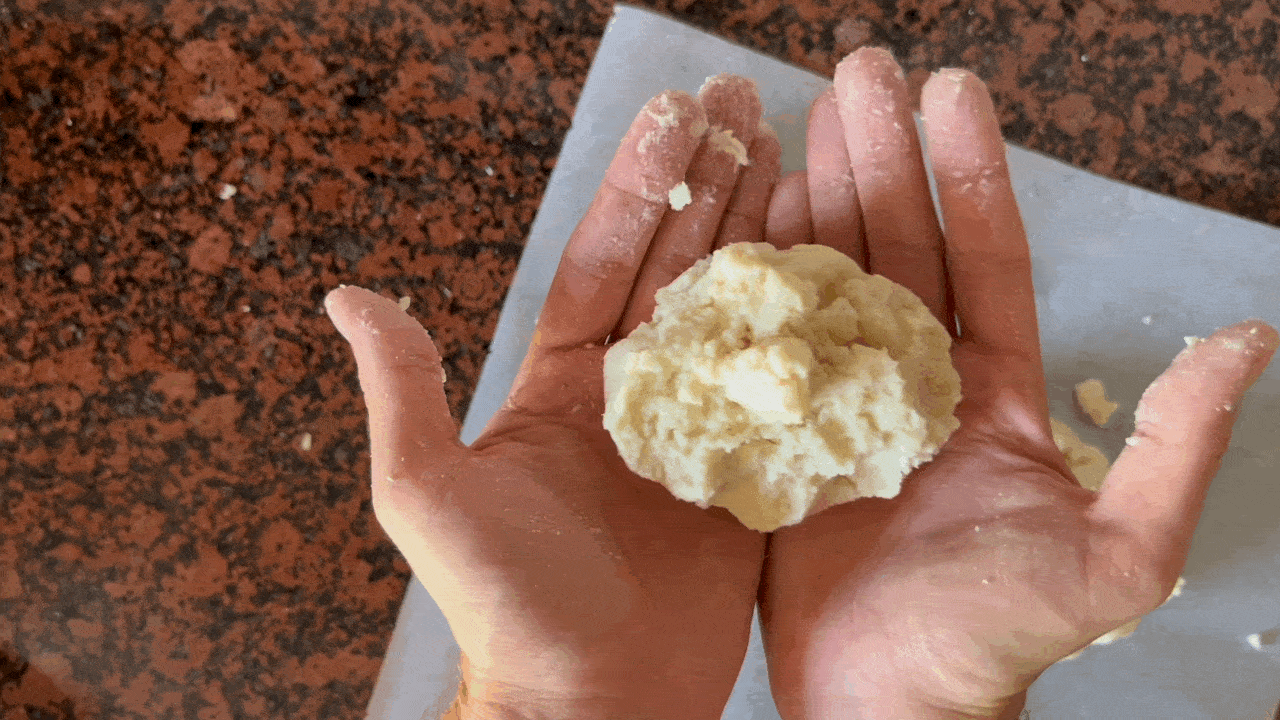
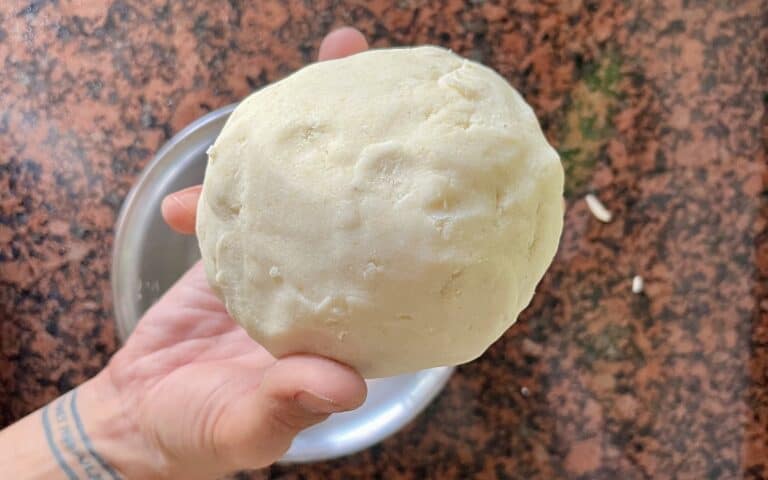
- Combine the Ingredients: Mix the flour, salt, and water. Quickly knead the mixture by hand until all the flour has absorbed the water. This typically takes less than a minute and results in a heavy, non-sticky dough.
- Adjust Consistency: At this stage, achieving the right dough consistency is crucial. You want a firm yet flexible dough that is not sticky but holds together. Adjust the consistency by adding more flour or water until you're satisfied.
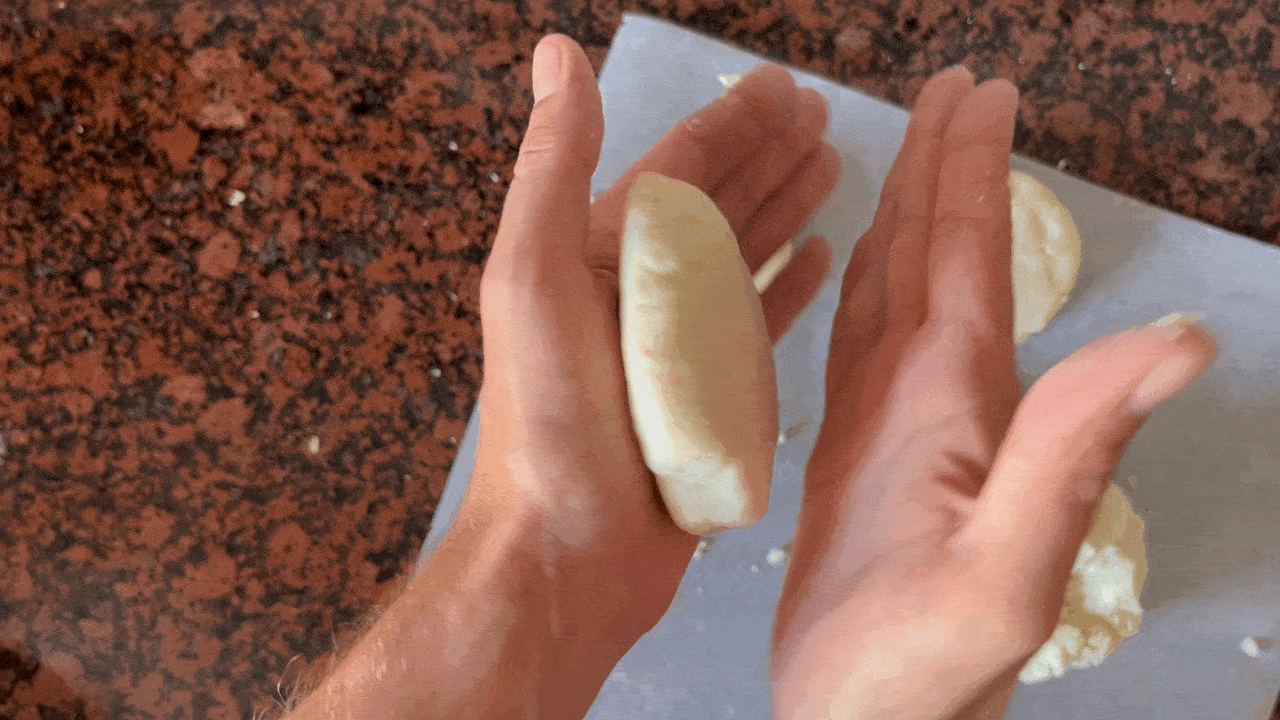
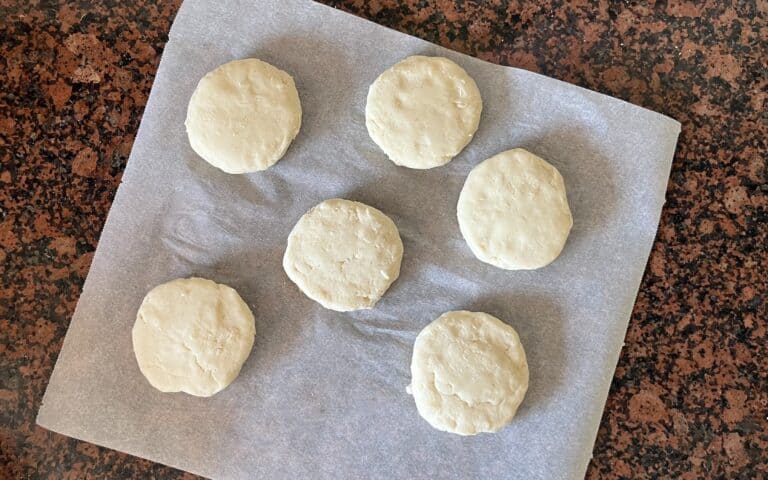
- Divide and Shape: Divide the dough into six equal portions and shape each portion into a ball. Softly press the dough between your hands to flatten it, creating round arepas that are approximately 2 cm (0.75 inches) tall.
Baking Methods
Pan-Frying
- Preheat the Pan: Preheat a pan over medium-high heat. Wipe a thin layer of oil onto the pan using a kitchen towel.
- Fry the Arepas: Place the shaped arepas in the pan and cook them until they turn brown on each side. Typically, this takes around 5-8 minutes on each side. You'll know they're ready when they achieve a lovely golden hue and a crispy exterior. Pan-frying can result in the best crust.
Oven-Baking
- Preheat the Oven: Preheat your oven to 350°F (180°C).
- Coat with Oil: Gently coat the arepas with oil by using your hands to distribute it evenly.
- Bake the Arepas: Place the oiled arepas in the preheated oven and bake them for approximately 20 minutes or until they turn golden brown. The oven method ensures a consistent, all-around crispiness.
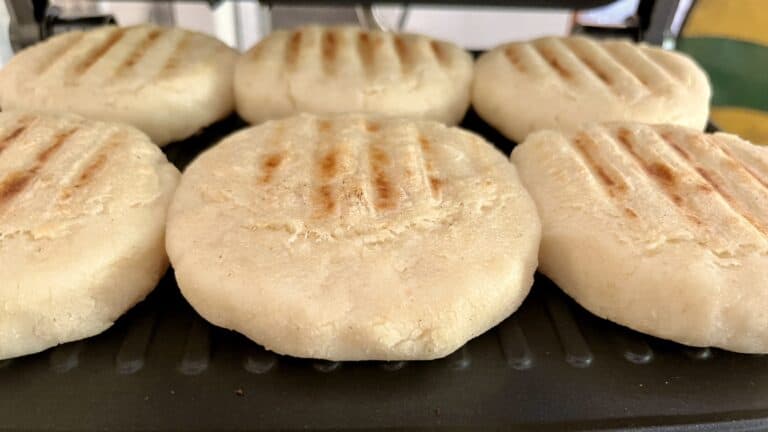
in a Contact Grill
- Preheat the Contact Grill: Set your contact grill to a medium-high setting.
- Coat with Oil: Gently coat the arepas with oil using your hands to ensure even distribution.
- Grill the Arepas: Place the oiled arepas on the contact grill and close the lid. Press the lid to ensure full contact between the arepas and the grill. Listen to the satisfying sizzle as they cook. After 5-8 minutes, the arepas should develop a beautiful brown crust. This method is the fastest and gives the best texture variation.

Variations of arepas
Arepas are incredibly versatile, extending beyond just the fillings you choose. Once you know what a good dough should feel like, you can experiment with the flavor and texture by incorporating various ingredients. Here are some exciting variations to try:
- Cheese-Filled Arepas: Add a delightful surprise by placing a slice of cheese inside the dough before cooking. The result? A gooey, melty, cheesy center that complements the crispy exterior.
- Herb-Infused Arepas: Mix fresh or dried herbs directly into the dough to enhance the aroma and flavor. Herbs like cilantro, parsley, or thyme can impart a delightful herbal essence.
- Seed Arepas: Boost the nutritional value of your arepas by adding various seeds to the dough.
- Garlic Arepas: For those who adore the aroma of garlic, try mincing fresh garlic cloves and mixing them into the dough. The result is savory, aromatic arepas with a hint of garlic.
- Spiced Arepas: Add ground spices like cumin, paprika, or chili powder to your dough. These spices will infuse your arepas with a captivating, slightly smoky essence.
- Multigrain Arepas: For a healthier version, blend white corn flour with other grain flour like whole wheat or spelled flour. This variation offers additional fiber and nutrients.
How long can I store homemade arepas?
If you have cooked arepas you plan to eat within a few days, you can store them in the refrigerator. Place them in an airtight container or zip-lock bag. Refrigerated arepas can stay fresh for up to 3-4 days. You can reheat arepas using your oven, pan, contact grill, or a toaster with a stovetop griddle. Toast them for a few minutes until they're warm and have a crispy exterior. If they appear slightly dry, sprinkle some water on them before warming. You can also cut arepas in slices and fry them crip to create a delicious dipping bread stick.

Homemade Arepas
Video
Ingredients
- 3 cups white parboiled corn flour "harina de maiz, blanco"
- 3 cups lukewarm water
- 1 tsp salt
Instructions
- Combine the flour, salt, and water. Quickly knead it by hand until the flour absorbed all the water. This usually takes less than a minute and should produce a heavy, non-sticky dough. Adjust the consistency with the help of more flour or water until you're happy.
- Divide the dough into 6 pieces and shape each portion in a ball. Softly press the dough between your hands to flatten it. Each arepa should be roughly 2cm / 0.75 in tall.
Pan-frying the Arepas
- Preheat a pan to medium high heat. Wipe a thin layer of oil on your pan with the help of a kitchen towel.
- Fry the arepas from each side until brown. Typically, this takes 5-8 minutes on each side.
Baking Arepas in the oven
- Preheat the oven to 350°F / 180°C. Gently coat the arepas with oil by using your hands to distribute it evenly.
- Bake the arepas for around 20 minutes or until turning brown.
Baking Arepas in a contact-grill
- Preheat the contact grill on medium-high setting. Gently coat the arepas with oil using your hands.
- Place the arepas on the contact crill and close the lid. Press the lid down slightly, to ensure full contact between the arepas and the grill. Enjoy the sizzling sound coming up. After around 5-8 minutes the arepas should have developed a

Love this recipe? You’ll love my book too!
Learn to cook healthy and flavorful meals from scratch and boost your well-being through nutrition.
Get your copy of “Embracing Change” now.
Nutrients per serving
